Hi, my name’s David! I’m a 30 years old modeler from Rome, Italy. I resumed building model kits two years ago, after a 8 years break. My field is 1/48th planes, no matter if jet or propellers. If a plane likes me, I’ll try to build it!… This time I chose to represent a carrier fighter which stroke me from the first time I’ve seen it: the Dassault “Rafale” M.
“Rafale” is the last and more sofisticated plane built by the French “Dassault”. With its three version, the “C” and the “B” (single and double seats) for “Armee de l’Aire” (Air Force) and the “M” for the “Marine” (Navy) this plane seems to represent the French answer to Italy, Germany, Spain and England joint venture who generated “EFA 2000”. By looking at the advertisement seems that France wanted to bet on independence, by creating an Homeland-made fighter, putting all the know-how of whom “Dassault” is capable. If this will be a winning strategy we’ll know only in the future, so far we can only say that “Rafale” is one of the most fascinating fighter ever built, capable of many roles with the same machine.
In 1978, France, England and Germany joined to find a substitute for the “Jaguar”, creating “ACE (Avion de combat Europeèn - European Combat Plane) Project”. Sometime later, England and Germany quitted the program and in 1985 the first prototype “Rafale A” is ready, while in 1986 there was the first take off. After many simulations, the “Rafale A” was declared capable of carrier landing, giving green light to the “M” modifications, especially to the landing gear. Nowadays “Rafale M” is in service with “Flottille 12 F”, which is deployed on “Charles De Gaulle” carrier. The Rafale was first used in an operational theater of war during “Heracles Mission” in Afghanistan, 2001-2002 (source: www.rafale-marine.com).
In 48th scale we can choose between Heller (Rafale “A”) and Revell (Rafale “B”, “C” and “M”). Even if I don’t know the French kit, I can surely recommend the Revell one. It has finely engraved panels, a great number of well engineered parts and it’s a pleasure to built, with minimum use of putty. Terre are some cons, anyway, like the junction of the fuselage and air intakes, which is not perfect and will make you sweat a little while carefully sanding the part, paying attention to not erasing the fine detail... Some minor flaws are the gaps between wings and fuselage (nothing that some putty won’t fix) and the lack of covering inside the air intakes: in other words you can see the landing gear by looking through them. I realized too late of this, so I couldn’t fix it. Anyway is not such a terrible thing! The assembly begins as usual from the cockpit. Revell has done a great work with the seat. There are five parts composing it and with the Eduard PE set dedicated to Rafale, I challenge you to say is not a resin seat! The cockpit is just passable: a central MFD, the stick, the throttle and two side consolles. Painted in black with some drybrushing and the ensemble will take a little life!
Next step consists in closing the two fuselage halves, divided into upper and lower part (great choice indeed!). Before doing that I filled the housing of the two sensors located on the nose, in front of the windshield. In fact, in all of the pictures I’ve seen, the “Aeronavale” Rafales (the “M” version) have not this devices, which are present in “Armee de l’Aire” Rafale “C” and “B”. I filled the gap with some “Milliput” which I shaped with some wet sand paper once dried. Once glued the two fuselage halves, I concentrated on fin and wings. These consists of two parts each (again, upper and lower) which mate one into the other with no problems at all. I’ve also lowered the flaps and ailerons, to represent them like they are in reality, when the plane is parked. To do this I had to modify the two actuators situated under the wings: a ten minutes work, anyway. The fin needs some putty to be set properly. Real Rafales have arrestor hook that lays down when the plane is parked. The kit hook is molded in raised position, naturally, so I modified it to make it lay down. Caught in a paranoic modeling attack, I hinged the hook, instead of glueing it, so it is mobile. Useless, but I like it!...
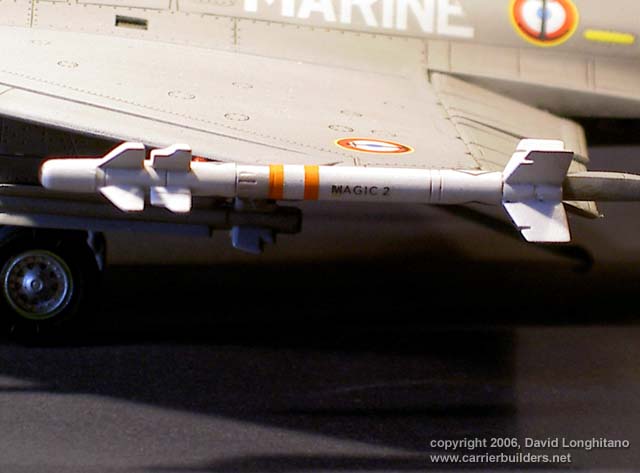
The landing gear is a little masterpiece! In particular the front leg is beautiful... Paint it with “Alclaad” White Aluminium, effect guaranteed!... The wheels are moulded with pound effect and look very convincing. Now let’s talk about ordnance and loads. Revell included three reservoir but, unfortunately, they are of the wrong shape. At least for the “M” version... In fact they are similar to those mounted on “B” and “C” Rafales, so I discarded them. The ordnance consists of four “MICA” medium range missiles and two “MAGIC” IR missiles. They need some cleaning before assembly, because of some ejector marks and flashes. The “MAGIC” missiles have a clear warhead: an adequate painting allows to simulate the lens of the IR seeker.
For my models I use Acrylics paints, above all “Gunze Sangyo” but also “Tamiya”. To render the tipical Rafale grey I mixed Gunze’s 307 and 317. Don’t ask me the percentage of the mix, because I don’t remember ;-)... After the paint dried (acrylics dry in some minutes, but I use to let them dry overnight) I sprayed two coat of “Future” and leaved the model into a box for three days. Next step was decaling. The kit decals are a little bit thick. Silvering could appear if you don’t use some decal solvent. I used “Microscale” solutions and nevertheless some silvering is visible. Damn it!... The kit decals are for two Rafales. The first is a sort of prototype of the “M” version, while the second is an operational plane of “Flottille 12 F”. I’ve chosen this one, although is to be said that decals are not the exact type. The most evident error is that the “MARINE” written is too big and that the roundels are to be placed ahead of the low-viz formation lights and not as shown on the instruction sheet. Unfortunately, nowadays, decals producer ignored this beautiful kit so this is the only way to have a “Marine” Rafale...
The last steps was attaching the landing gear (inserting the main gear legs was a bit tricky!) and the refueling probe, followed by the canopy. That’s right, finished!...
I wanted to put my model on a base which could represent its “natural environment”, so what better than a carrier deck? I scratchbuilted it this way: I took a wooden plate 1 cm thick and with an electric drill I made a lot of holes, equally distanced one to the other. I can’t remember the exact measure of the holes, but I think 3 mm should be the right one. Then I airbrushed the plate with Tamiya “German grey”. The next step was masking the base to create the lines. The lines were traced to represent a portion of the real deck of “Charles De Gaulle” French Navy Carrier, using an aerial pictures of the ship as a guide.
Then
I did some weathering to the base, airbrushing it with very diluted
Tamiya “Smoke”. I made the “grids” into the holes by reinforcing
some black cotton wire, the one used to sew clothes, with CA glue
and then I cutted it the right lenght and I glued it into the holes.
With some scratch plastic I made the chocks used to keep the plane
steady. I was tempted to anchor the plane with some chains, like the
real ones, but doing so I won’t be able to take the model off the
base to be examined or photographed.
I’d like to thank my girlfriend Chiara, for her precious help in judging my works. Next, thanks to Yiannis Lapadopoulos from Greece (I recommend you to have a look to his works on ARC) who sent me a CD full of information about Rafale and Enrico Bianchi, for his precious tips on creating the base.
That’s all, folks! Thank you very
much for your attention, hoping that my work will like you… Greetings from Italy! Photos and text © 2006 by David Longhitano January 10, 2006
|