|
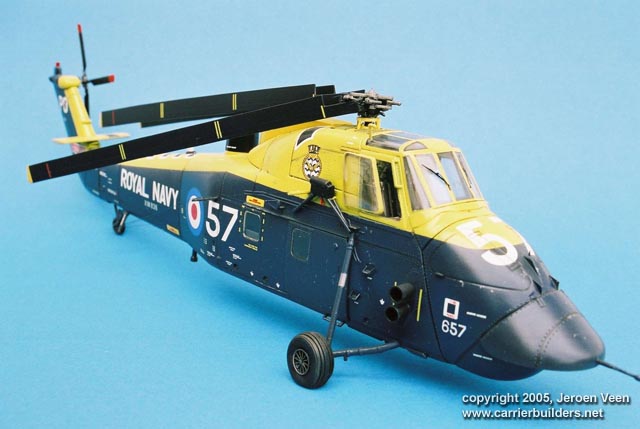
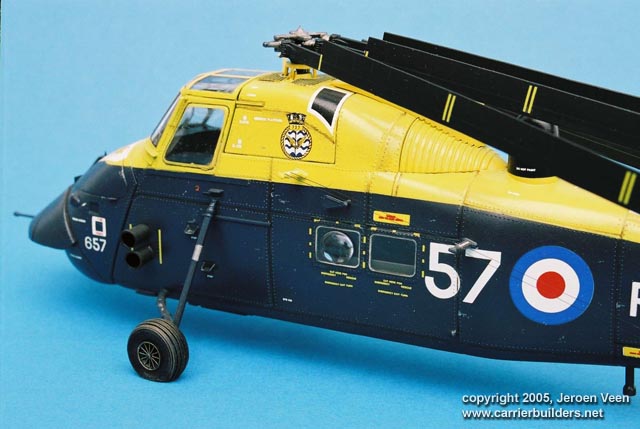
This is the Wessex,
1/48 from Revell. I bought this helicopter about two years ago on a trade show
in Germany. I was very surprised and happy to find it, because everywhere I had
been asking I was told that it was out of production a long time. I had
purchased already a Cutting Edge update set for the cockpit and landing gear (I
was under the assumption that the helicopter was still available). And I had
seen an article in Scale Aviation Modeler on the Wessex and I fell in love with
this helicopter.
Coming home in
Holland I opened the box and then there was a bit of a shock. The helicopter was
molded in blue plastic from a unusual substance, the detail was very rough, the
decals were old and just a little bit out of register. But I had seen this blue
and yellow version in the magazine and I couldn't care less about all those
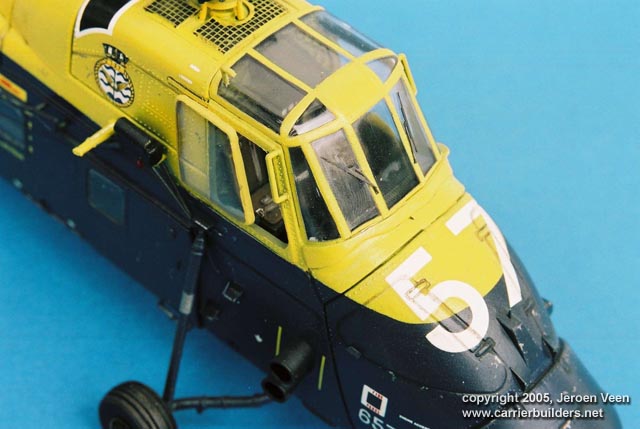
problems. Some would be solved, others not. So I started with the interior,
which I usually paint with Humbrol paints. They have a bit rougher pigment than
the Xtracolor paints I normally use, and this makes the Humbrol paint very
suitable for weathering and drybrushing. I like to do this a little bit in the
cockpit areas, because the transparency of the glazing tends to tone it all down
a bit afterwards.
On the cover of the box was the Wessex 'in flight'; I didn't have a pair of
scale plans at the time so I took the picture on the box as a lead and started
scratchbuilding. extra detail was added around the cockpit area, the nose,
the landing gear and steps at the sides of the helicopter, the rear rotor and
some other minor places. To be honest I was more proud of my first
scratchbuilding efforts than the correctness of the detail. I know there are
some inaccuracies, nut I felt I added extra value to the basic model, and that
gave me great satisfaction. I primed the helicopter with Humbrol primer (no1).
This was the first time all those parts got some uniformity and blended
together. The toy-like blue of the plastic disappeared and my Wessex started to
look like a real model.
You can imagine that adding the blue and the yellow (of course after preshading
all pane lines with black) took a lot of masking and masking off. But the end
result was nice. Now came the decaling. I was very curious, because this
particular box was over 25 years old and I wasn't quite sure whether the decals
were ok still. Their carrier film had gone yellow over the years, but I taped it
in the window and with a couple of days sun on the decals the yellow disappeared
(don't ask me why, it works!) I tested the decals on a piece of scrap plastic
and all was ok. So I used the kit decals, even when they were a bit out of
register, just because I had no other option.
After
decaling came the usual approach; matt varnish base, thoroughly dry,
washing with brown and black oil paints thinned with white spirit,
scratching and scraping painted on, another coat of matt varnish and
adding final details.
Although this kit is far from perfect (as is my building) I am happy to
have it in my collection. It is very colorful and since I know how it
came into existence and what I have done to it, I still like to look at
it. I hope you like the pics. By the way; if anyone has a complete kit
on the shelve and wants to sell it to me, please contact me on my email
address; I recently saw a total maroon colored version, so my hands
started itching again...... thanx in advance!
Although this kit is
far from perfect (as is my building) I am happy to have it in my collection. It
is very colorful and since I know how it came into existence and what I have
done to it, I still like to look at it. I hope you like the pics. By the way; if
anyone has a complete kit on the shelve and wants to sell it to me, please
contact me on my
email address; I recently saw a total maroon colored version, so my hands
started itching again...... thanx in advance!
Photos and text © 2005 by
Jeroen Veen
June 29, 2005
www.carrierbuilders.net |